How to set up a Raspberry Pi headlessly after April 2022 update. No monitor required
If you're planning on using your Raspberry Pi just to run software on it, or to control electronics, there is no need to set up a monitor, mouse and keyboard for it. You can simply connect it to your home network and use it from your main computer. Setting up a device like this is called headless setup.
The problem is that the Raspberry Pi's operating system which often comes preinstalled with it, or can be easily installed onto it, comes without any form of remote access enabled. Luckily for us, we can enable them with just a few simple additional steps in the setup process. Let's get into it!
Table of Contents
- Installing the Operating System
- Connecting with SSH (terminal access)
- Connecting with VNC (desktop access)
- Debugging
Installing the Operating System
Whether your Raspberry Pi came with a preinstalled OS or you're using a blank storage device, a headless setup requires a new install of the operating system:
Insert a microSD card into your computer.
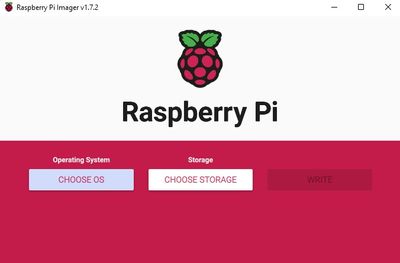
Download, install and run the official Raspberry Pi Imager
Click on the Choose OS button

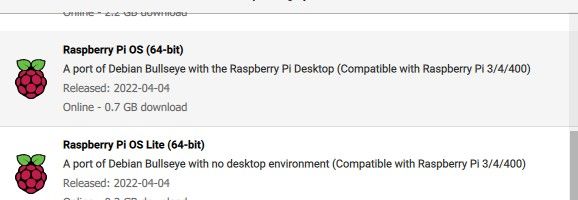
- Choose your operating system
If you don't understand the difference between a 32 and 64-bit version of an operating system and just want to get on with the installation, I would recommend installing the 64-bit version of Raspberry Pi OS. You can find it by clicking Raspberry Pi OS (other)

Whichever you choose, you probably won't notice a difference unless you're an experienced user. If you're curious, you can of course spend some time figuring out which option is the best for you by using your favourite search engine.
- Click Choose SD card and select your card from the menu. Do not click write yet
If you wanted to set up your Pi with a monitor, keyboard and mouse, you could skip the next step. However, if you want to do a headless setup, the next step is essential. This is also the part that has changed after the April 2022 update and older tutorials won't mention this at all.
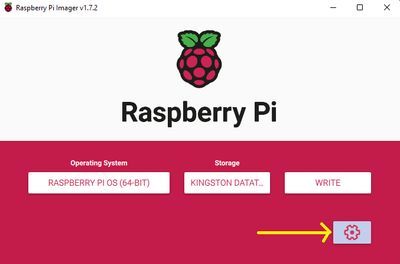
- Click on the settings icon on the bottom right to open Advanced options

Let's go through all the options here so you'll have a better understanding of what they mean.
The image customazation options This dropdown menu is quite straightforward. You can choose to apply these settings for only this setup or to save them for all Pi future setups.
Set hostname A hostname is a label that will allow you to identify your Raspberry Pi in your local network. If this is your only Raspberry Pi, I would leave this as default but you can also change it to whatever you like. We will use this hostname later.
Enable SSH SSH or Secure Shell is a network protocol which gives you a safe access from one computer's terminal/command line to that of another. This is what will allow you to communicate with your Pi. Enable it and select "Use password authentication".
Set username and password Here you can choose the login credentials for your Raspberry Pi. Feel free to choose credentials you like and be sure not to forget them.
Configure wireless LAN If you want to use WLAN to connect to the internet, you can type your home Wi-Fi's SSID and password here. If you want to use a wired connection, you can keep this option disabled.
Set locale settings This will allow you to set the time zone and keyboard layout for your Pi.
Play sound when finished If you enable this, your computer will play a sound when the Imager has written the OS onto the SD card
Eject media when finished If you enable this, the SD card will be automatically ejected and you won't need to "Remove it safely"
Enable telemetry Enabling this will tell the Raspberry Pi foundation which OS version you installed so that they can measure which ones are the most popular options.
Click write. This can take several minutes.
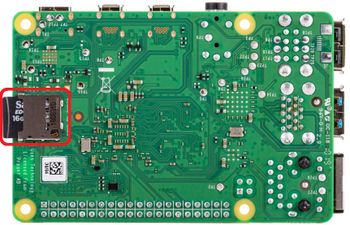
When the Imager has finished writing the OS, install the SD card into the slot on the back of your Raspberry Pi:

Connecting with SSH (terminal access)
After you've inserted the SD card, connect the power plug and, unless you set up Wi-Fi on step 6, also connect an ethernet cable.
Open the terminal or command line on your computer and try the command below. Be sure to use the username and hostname you set up on step 6.
ssh username@hostname.local
When you first connect to your Pi, it will probably ask you about a fingerprint. Just type 'yes' and press Enter.
After this, you're prompted to write a password. Enter the password you set up on step 6 and press Enter. Note: The characters of your password won't appear in the terminal as you type them. This is a normal privacy precaution.
That's it. You're now logged in to the terminal of your Raspberry Pi. If you encountered an error, see the debugging section on the bottom of this blogpost.
Connecting with VNC (desktop access)
Having access is often all we need. However, sometimes we want to use our Pis as if it was connected to a monitor. We can do this from an another computer using VNC. Let's set it up.
- Connect to your Pi with SSH and run the following command:
sudo raspi-config
A blue-white configuration interface should appear.
Use up/down arrow keys and Enter to select Interface Options
Select the line that says VNC and hit Enter again to enable VNC.
Use left/right arrow keys to select Finish and hit Enter
Setting up a VNC client on your computer
Download, install and run VNC Viewer
Select New connection from the File menu
In the VNC Server field, write the hostname of your Pi, e.g. raspberry.local
Click OK and double click on the connection icon with the hostname of your Pi on it
When prompted, enter the username and password of your Pi.
After a few seconds, you should see the desktop environment of your Pi.
Debugging
If something didn't work, here are some possible solutions.
'ssh' is not recognized as an internal or external command` Your computer doesn't have SSH installed to it. If you know how to install it, feel free to do so. Otherwise, I'd strongly recommend installing a free SSH client called Putty. You can download and install it from here.
When you open Putty 1) enter the hostname of your Pi 2) make sure Connection type is "SSH" 3) Click "Open" This will connect you to your Pi.
ssh: connect to host hostname.local port 22: Connection timed out It seems like your Pi is not connected to your home network. Try waiting a few minutes. Your Pi might still be waking up. If waiting doesn't help and you're using Wi-Fi, try writing the OS to your SD card again and be extra careful writing the SSID and password of your router.
Permission denied, please try again Make sure you used the exact same username and password here that you configured on step 6. If you still can't login, it's possible you made a typo during the configuration process. Try writing the OS to your SD card again and be extra careful writing the username and password.